Rotate/Swap your Coldkey
This page describes how to rotate or swap the coldkey in your wallet. This is required if you suspect your coldkey has been leaked. Your coldkey secures your identity on Bittensor.
See:
Description
The btcli command does not yet support this schedule coldkey swap feature. You must use the Polkadot JS extension.
The schedule coldkey swap feature works as follows:
- The schedule coldkey swap feature enables you to schedule the swapping of source coldkey to a destination coldkey. If you feel your existing coldkey is potentially compromised, then use this feature to schedule a swap to a destination coldkey.
- When you use this feature, it will not immediately swap your coldkeys and swap your TAO funds from the source coldkey to the destination coldkey. It will only schedule the swap event.
- All scheduled coldkey swaps will be executed on-chain. Your scheduled coldkey swap will execute on the mainnet exactly 5 days after you successfully scheduled the coldkey swap using the method described in this document.
- The source coldkey you used in this method will be locked when you schedule the swap. After the 5-day period is elapsed your original coldkey will be unlocked entirely.
- Cost: The cost of this coldkey swap transaction is 0.1 TAO. This must be available in your source coldkey.
- Any subnet ownership from your source coldkey will move to the destination coldkey.
- The delegated stake will be transferred from your source coldkey to the destination coldkey.
- For those who were staking to a validator from their source coldkey, their staking TAO will transfer to the destination coldkey.
Requirements
- To execute this operation, you must own the source coldkey.
- The destination (new) coldkey public key must not already be assigned to a hotkey or a coldkey that is associated with any hotkeys.
- Confirm the identity of the destination coldkey. A mistake here can result in loss of all of the source coldkey's assets and identity.
- If you are rotating the coldkey to maintain ownership, you must control the destination coldkey privatekey. Otherwise you will lose control over all of the source coldkey's assets and identity.
- If you are transferring ownership to someone else, confirm that they have secure control of the destination coldkey private key.
- You must use the Polkadot JS extension. The
btclicommand does not yet support scheduling coldkey swap. - You must import your source and destination coldkeys into the Polkadot JS extension.
- You must connect the source coldkey account to the polkadot.js.org/apps website.
Steps
Follow the steps shown below the screenshot:
Step 1: Connect to the subtensor network on Polkadot.js
Open your web browser and navigate to the Polkadot.js Apps website (https://polkadot.js.org/apps/?rpc=wss%3A%2F%2Fentrypoint-finney.opentensor.ai%3A443#/).
Step 2: Navigate to the Extrinsics page
From the top navigation menu, proceed to Developer > Extrinsics to open the Extrinsics page. If you do not see this option, then make sure you successfully imported your source coldkey into the Polkadot JS extension, and connected this source coldkey account to the Polkadot.js Apps website.
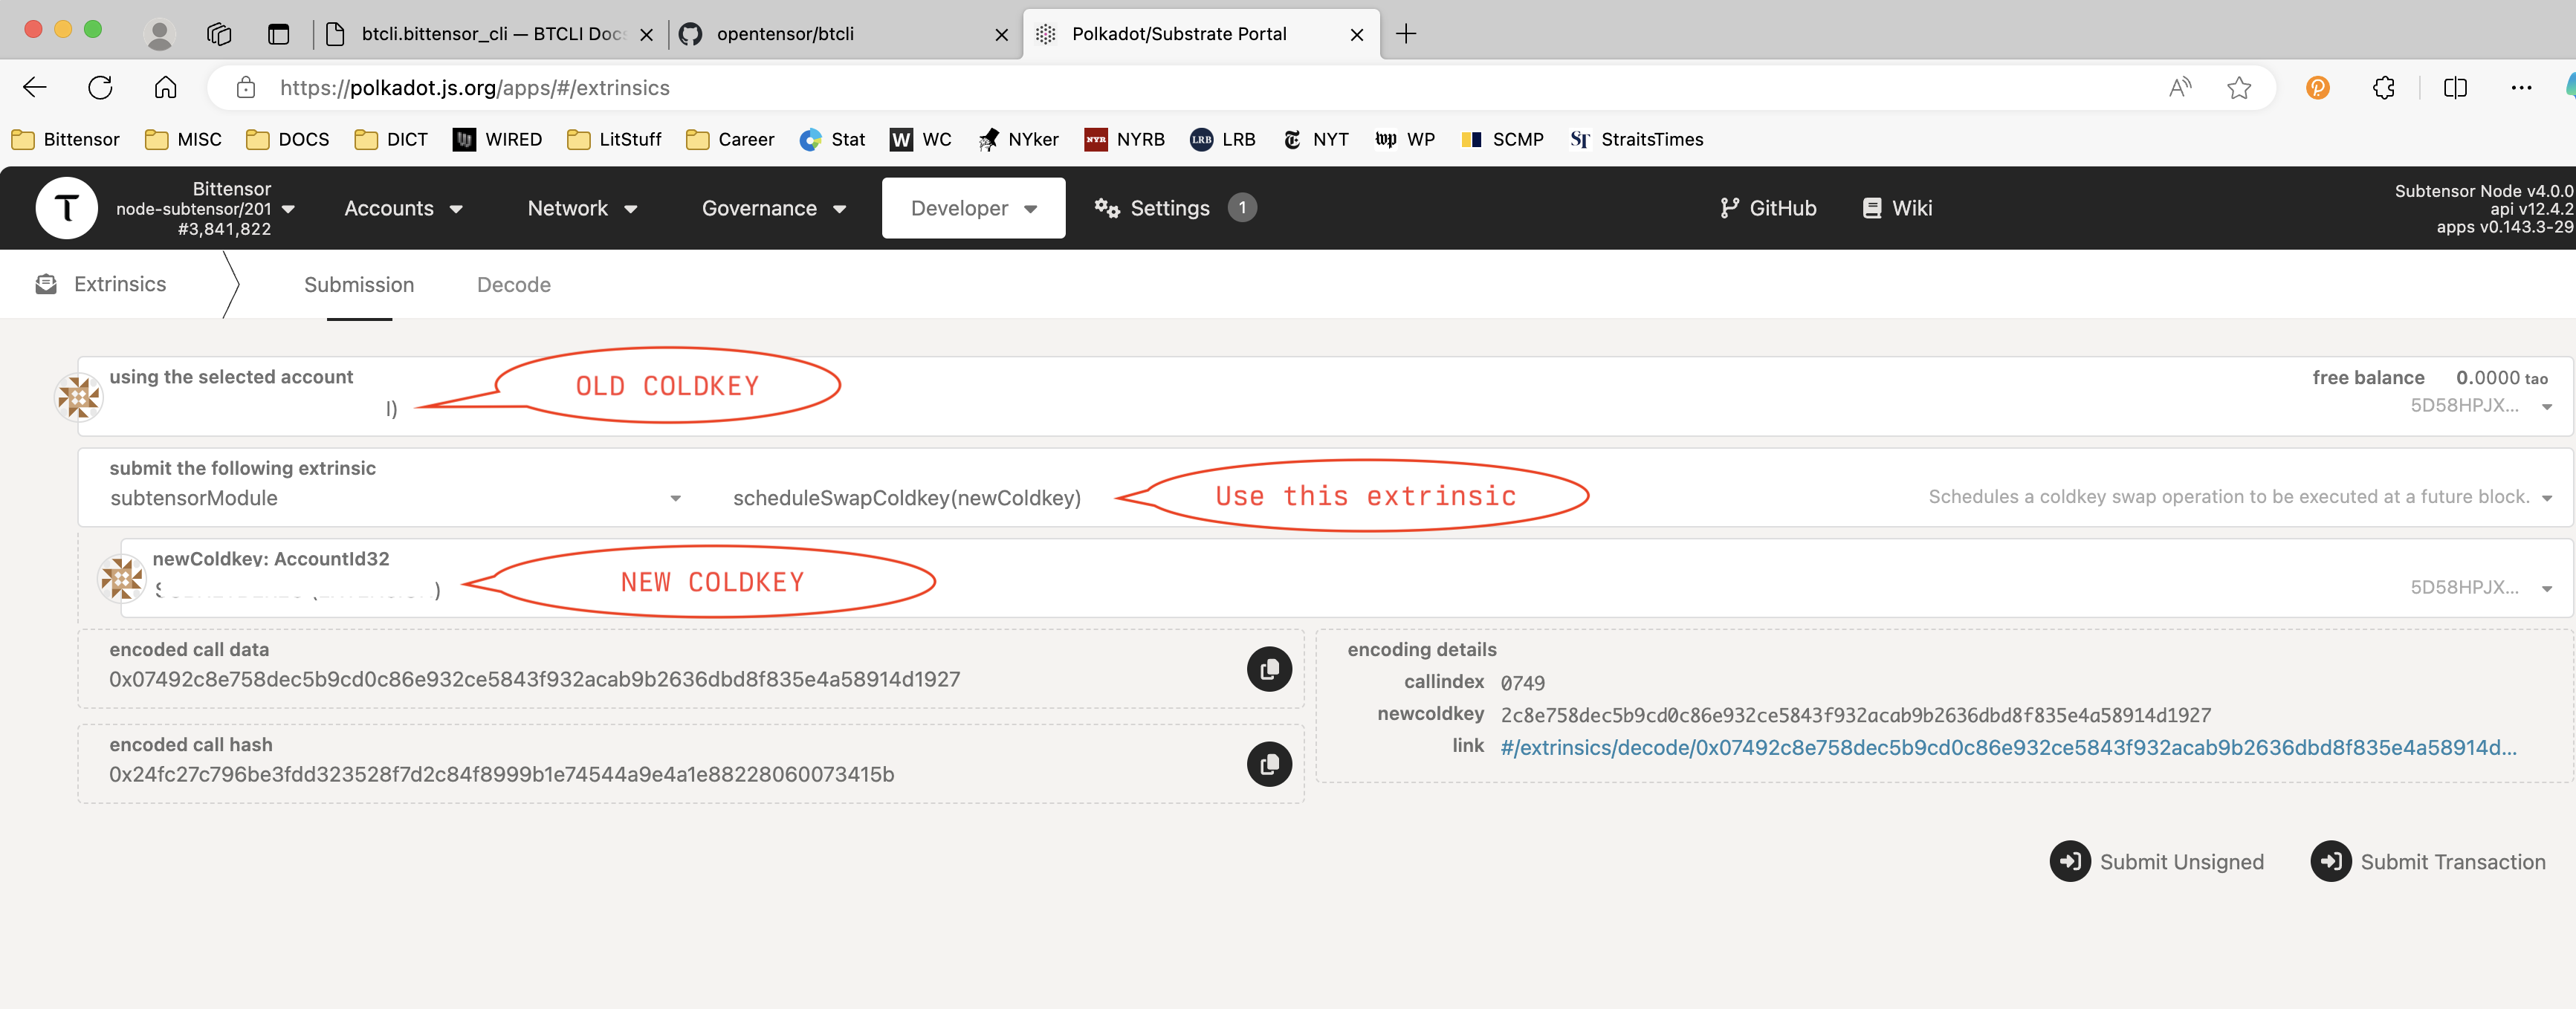
Step 3: Select your source coldkey account
Locate the drop-down section labeled using the selected account and select your connected account. This account should be your source coldkey account.
Step 4: Select the subtensorModule
Locate the drop-down section labeled submit the following extrinsic and select subtensorModule.
Step 5: Choose the scheduleSwapColdkey function
After selecting the subtensorModule, a second drop-down menu will appear on the right side of it. From this drop-down select the scheduleSwapColdkey option.
Step 6: Provide the destination coldkey
Provide your destination coldkey in the newColdkey: AccountId32 field.
Step 7: Submit the transaction
Check again that you have provided the correct source and destination coldkeys.
Scroll down to the bottom of the page and click on the Submit Transaction button. Polkadot.js will prompt you to sign the transaction using the selected account. After you sign the transaction, the signed transaction will be broadcast to the Subtensor.
Verify
Your scheduled coldkey swap will execute on the mainnet 5 days after you successfully scheduled the coldkey swap using the above method. Check your destination coldkey after 5 days to verify.